
 1. Why you need this device ... ...
| Home | FAQ | General | Buy now | Fitting instructions, Estima |
Ace Answers engine temperature alarm. Fitting instructions for Townaces.
1. Why you need this device ... ...
What's your approach to overheating in your Townace? Just hope it doesn't happen? Regular inspection? Modify the fan, the thermostat, or something else?
What happens the day a tiny leak starts or your thermostat sticks closed? The standard Toyota temperature gauge will alert you once the head temperature rises above about 110C - provided you, or whoever's driving, notice it. Is that good enough? You can invest in a Durite gauge, find a place to fit it, change the sender unit in the engine and then you'll have a more sensitive indication - but is the driver going to spot trouble early enough?
2. This device was designed ... ...
To give the owner a high level of confidence that the driver, who may be less diligent than the owner would like, will be alerted immediately the head temperature rises above normal. The audible alarm has an adjustable trip level which the owner can set to a chosen point on the dial.
To be easy to fit and use.
To compensate for the "flat spot" in the Toyota gauge's response and expand the usable range of indication so you can more easily watch temperature variations and hope to spot a crisis developing, e.g. a leak or faulty thermostat.
3. How this device works ... ...
The box contains a sounder which produces an intermittent tone and some circuitry with one adjustment knob. It has three connections, all to the back of the temperature gauge, behind the instrument panel. Two of these are for +V/supply and 0V/chassis, the third connects to the T.U. terminal on the gauge, to which the thermistor sensor in the engine also connects. This device senses the voltage on the TU terminal and does two things. First it draws a carefully controlled additional current from the TU terminal, depending whether the gauge is below or above the flat spot, which expands the scale as required. Second it operates the sounder whenever the voltage on the TU terminal is below the fraction of the supply voltage set by the single adjustment. Note that the adjustment only affects the alarm trip level, not the way that the gauge reads.
Below is the best estimate of the results of fitting the device - the variation between individual cars seems to be as much as plus or minus 5 deg C, but the value is in spotting deviation from whatever your "normal" is rather than in any absolute indication of the temperature of the sensor, also in noticing situations which cause the temperature to rise.

4. Access behind the dashboard ... ...
1)Park without bright sun shining in your face and with the steering wheel "upright" so that the spokes don't get in the way.
2) With a medium size (1) posidrive screwdriver remove the two screws (under the top of the trim) that secure the inner trim surrounding the speedo and instruments. Gently lever the top edge down and carefully pull the trim straight out towards you. Some clips secure it - just pull.
3) Remove the four screws that secure the speedo/instrument panel (Not the two at the top that hold the transparent cover on to it.)
4) Pull the panel forward gently and look round the back from the right hand side. You can see three electrical connectors which you can remove by pinching the clips on the long sides and pulling gently away from the panel.
5) Twist the panel - pull the right side towards you and push the left side away from you inside the cavity. Look round the back again, the speedo cable will be visible, and prevents you from pulling the panel all the way off. You must release this cable by reaching round the back and squeezing the (greasy) spring-loaded clip on the barrel at the end of the speedo cable. The panel should now come all of the way off, but you may want to clean your fingers first!
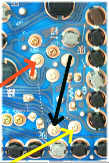
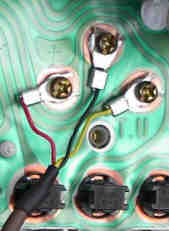
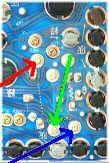
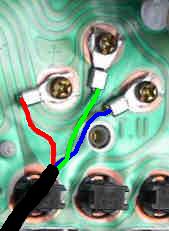
5. Installing the alarm ... ...
Connect to the three terminals behind the temperature gauge as shown. Your alarm may have a brown cable with Yellow, Black and Red wires, or a black one with Blue, Green and Red wires. The blue pictures are of 1993 onwards models, the green pictures are of older models. Refer to the correct illustration. Yellow or Blue are the TU/sensor connection, Black or Green are Gnd/0V, Red is V+.
Self-adhesive velcro pads (supplied) may be used to fix the box, one piece near each end. More access to it will be needed during initial adjustments so dont hurry to decide where you really want to fix it. If you need to change the wiring route you can do it without disconnecting behind the instrument panel - the wires can easily be temporarily detached from the screw terminals inside the box.
6. Adjustment and use ... ...
Turn the blue adjustment knob fully anticlockwise so that the alarm will sound at a relatively low temperature. Soon after you start the engine you will notice the gauge is reading differently. Dont panic! The engine is almost certainly just the same, its the gauge thats telling you something different. Whenever the alarm sounds turn the blue knob clockwise a small amount and it will stop. At this stage it helps to support the box somewhere where you can do this easily. Quite soon you will have set the trip level to just above your normal maximum temperature and you can fix the device in a more permanent location.
If the temperature is very close to the trip level you will notice some hesitant sounding of the alarm, particularly when the supply voltage is pulled down by operating the turn indicators etc. This is normal.
Occasionally you will want to reduce the trip level again slightly to satisfy yourself that the alarm is still working. It can be made much louder if you want - just remove the contents and drill a small hole or two in the box above or below the sounder.
What to do when the alarm sounds for real? A sensible first step will be to again increase the trip level slightly but if that doesnt stop it then its time to let the engine cool off at least, check the coolant level and possibly call for assistance - otherwise a small repair job could become a large and very inconvenient one.
7. Faults ... ...
Ace Answers are committed to correcting any faults, and making improvements, within the alarm unit, but cannot accept responsibility for how the alarm is used and therefore for the degree of protection it provides.
It is the owners responsibility to check from time to time that the alarm is working, and to set it as desired. The driver can turn off the alarm but should be aware of the risk of then continuing the journey.
With so many variants of Toyota "Aces" it is impossible to be sure this device will work with them all. The full purchase price will be refunded if it is returned (see below) within 15 days with details of any model in which it did not work satisfactorily.
If you decide to remove the alarm you do not need to go behind the instrument panel. Detach it from the wires and prevent them shorting against each other or anything else. If you return the device to Ace Answers for any reason you do not need to return the cable.
Dave Mason, 26 June 2003.